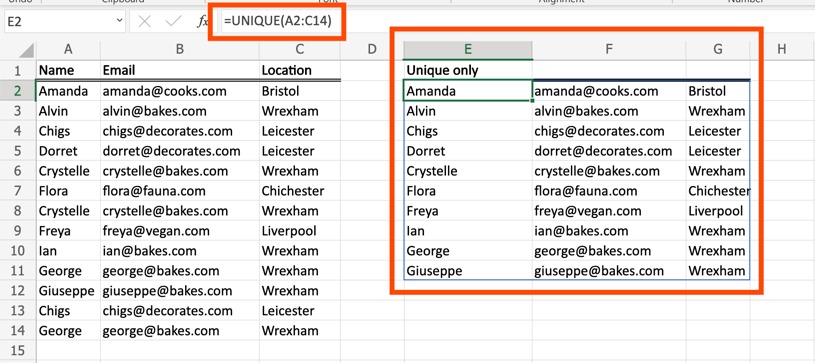
Dealing with duplicate data can be a common challenge in Excel, as it can clutter your spreadsheets and skew your analyses. Fortunately, Excel offers a straightforward solution to identify and remove duplicate entries, ensuring your data remains clean and organized. In this comprehensive guide, we’ll walk you through the process of deleting duplicates in Excel, empowering you to maintain a streamlined and efficient workbook.
Understanding Duplicate Data in Excel
Duplicate data refers to entries in your Excel spreadsheet that are identical or very similar across multiple cells or rows. These duplicates can occur for various reasons, such as human error during data entry, data merging from different sources, or simply the nature of the information you’re working with.
Identifying Duplicates: Utilizing Excel’s Built-in Tools
Excel offers several built-in tools to help you identify and manage duplicate data. Let’s explore the step-by-step process:
- Select the Data Range: Begin by selecting the range of cells or rows in your spreadsheet that you want to check for duplicates.
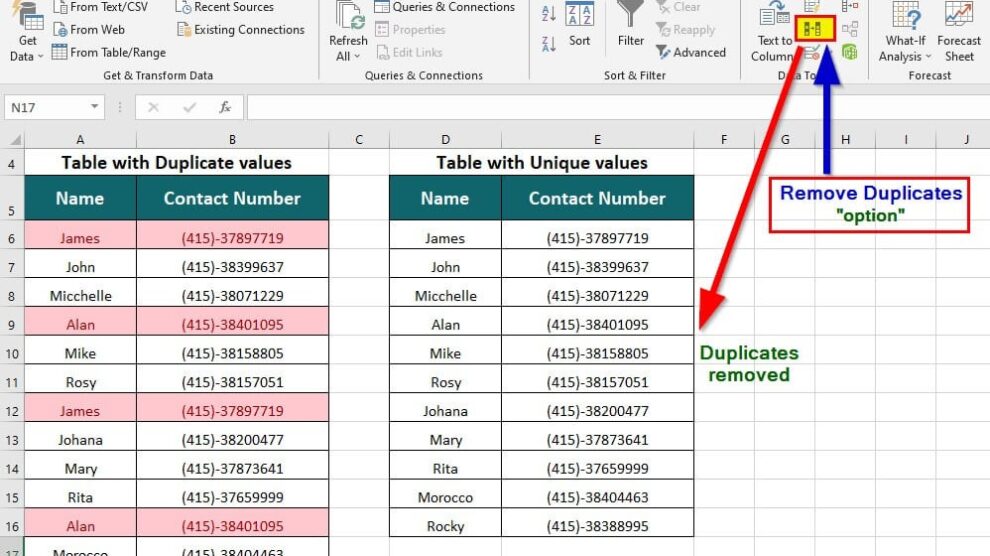
- Navigate to the Data Tab: In the Excel ribbon, locate and click on the “Data” tab.
- Click the “Remove Duplicates” Button: In the “Data Tools” section of the Data tab, you’ll find the “Remove Duplicates” button. Click on it to initiate the duplicate detection process.
- Customize the Duplicate Check: Excel will present a dialogue box that allows you to select the columns you want to consider when identifying duplicates. Ensure that all the relevant columns are selected, then click “OK” to proceed.

Deleting Duplicates: Preserving Your Data Integrity
Once you’ve identified the duplicate entries, Excel provides a straightforward method to remove them from your spreadsheet:
- Review the Duplicate Detection: Excel will highlight the duplicate rows in your spreadsheet, allowing you to review the identified duplicates.
- Decide on Retention: Determine which of the duplicate entries you want to keep and which ones you want to delete. This decision may depend on the nature of your data and the specific information you need to preserve.
- Delete the Unwanted Duplicates: With the duplicate rows selected, simply press the “Delete” key on your keyboard or right-click and select “Delete” from the context menu to remove the unwanted duplicates.
Verifying the Deletion: Ensuring a Clean Spreadsheet
After removing the duplicate entries, it’s essential to double-check your spreadsheet to ensure that all the unnecessary duplicates have been eliminated. Visually scan the data or use Excel’s filtering tools to quickly identify any remaining duplicates that may have been missed.
Advanced Techniques for Duplicate Management
While the built-in “Remove Duplicates” feature is a powerful tool, Excel also offers additional advanced techniques for managing duplicate data:
- Conditional Formatting: Use Excel’s conditional formatting feature to highlight duplicate values, making them easier to identify and address.
- Advanced Filtering: Leverage Excel’s advanced filtering capabilities to create custom filters that identify and display only the unique entries in your spreadsheet.
- Power Query: Explore the Power Query add-in in Excel, which provides more advanced data transformation and deduplication capabilities.
Conclusion: Maintaining a Clean and Efficient Excel Spreadsheet
By following the steps outlined in this guide, you can effortlessly identify and delete duplicates in your Excel spreadsheet, ensuring a clean and organized data set. Regularly reviewing and removing unnecessary duplicates is a crucial aspect of maintaining the integrity and efficiency of your Excel workbooks.
Remember, the ability to effectively manage duplicate data is a valuable skill that can significantly improve your data analysis and decision-making processes. Embrace the power of Excel’s deduplication tools and enjoy the benefits of a well-organized and clutter-free spreadsheet.


Add Comment