In the ever-evolving digital landscape, efficient disk management is a crucial skill for Windows users, system administrators, and IT professionals. One important aspect of disk management is the ability to delete partitions, which can help you reclaim valuable storage space, reorganize your file system, or prepare your storage devices for new configurations. In this comprehensive guide, we’ll walk you through the step-by-step process of deleting partitions using the DiskPart utility, empowering you to take control of your Windows storage environment.
Understanding the Importance of Deleting Partitions
Deleting partitions in Windows serves several key purposes:
- Reclaiming Storage Space: Unused or outdated partitions can occupy valuable storage space on your hard drives or solid-state drives. Deleting these partitions can free up that space, allowing you to allocate it to more important data or applications.
- Reorganizing File System Structure: Partitioning your storage devices can help you organize your files and data in a more logical and efficient manner. Deleting old or unnecessary partitions can simplify your file system structure and improve overall storage management.
- Preparing Disks for New Configurations: Before creating new partitions or formatting a disk, you may need to delete existing partitions to ensure a clean slate and prevent potential conflicts or data loss.

How to Delete Partitions Using DiskPart: Step-by-Step Guide
Now, let’s dive into the step-by-step process of deleting partitions using the DiskPart utility:
Step 1: Open the DiskPart Utility
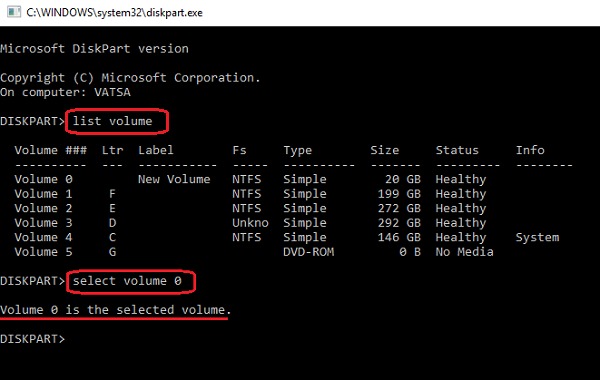
To begin, open the Command Prompt (cmd.exe) or PowerShell as an administrator. Then, type the following command and press Enter: diskpart This will launch the DiskPart utility, a powerful command-line tool for managing disk and partition configurations.
Step 2: List the Available Disks and Partitions
Once you’re in the DiskPart utility, use the following command to list all the available disks and partitions on your system: list disk This will display the disk numbers, sizes, and other relevant information about the disks connected to your computer.
Step 3: Select the Disk Containing the Partition to Delete
After identifying the disk that contains the partition you want to delete, use the following command to select that disk: select disk Replace with the number of the disk you want to select, as displayed in the previous step.
Step 4: List the Partitions on the Selected Disk
To view the partitions on the selected disk, use the following command: list partition This will display the partition numbers, sizes, and other details about the partitions on the selected disk.
Step 5: Delete the Partition
Once you’ve identified the partition you want to delete, use the following command to delete it: delete partition number= Replace with the number of the partition you want to delete, as displayed in the previous step.
Step 6: Confirm the Deletion
After executing the delete partition command, DiskPart will prompt you to confirm the deletion. Type “yes” and press Enter to proceed with the partition deletion.
Conclusion: Embracing Efficient Disk Management
Deleting partitions using the DiskPart utility is a powerful skill that can help you optimize your Windows storage environment. By following the steps outlined in this guide, you can reclaim valuable disk space, reorganize your file system, and prepare your storage devices for new configurations, all while maintaining a lean and efficient disk management strategy.
Remember, proper disk management is crucial for the overall performance, security, and reliability of your Windows system. Embrace the power of partition deletion, and let the benefits of a well-organized storage environment transform your Windows computing experience.


Add Comment