Deciding to delete your QuickBooks account is a significant move, especially for users who rely on this software for financial management and accounting tasks. Whether you’re transitioning to a different accounting software or wrapping up a business, understanding the process to properly and securely delete your QuickBooks account is essential. Here’s how you can do it, step-by-step.
What Is QuickBooks and Why Delete an Account?
QuickBooks is a widely-used accounting software developed by Intuit that helps businesses manage their financial operations effectively. It allows for tracking expenses, payroll processing, and financial reporting. Reasons for deleting a QuickBooks account can vary, including business closure, migration to a different accounting platform, or dissatisfaction with the service.
Step-by-Step Instructions on Deleting Your QuickBooks Account
Deleting a QuickBooks account involves several steps, which may vary slightly depending on whether you are using QuickBooks Online or a desktop version. Below are the general steps for QuickBooks Online, as it’s the most commonly used version.
Step 1: Cancel Your QuickBooks Subscription
Before you can delete your account, you need to cancel any active subscription with QuickBooks. Here’s how to do it:
For QuickBooks Online:
- Log In: Sign into your QuickBooks Online account.
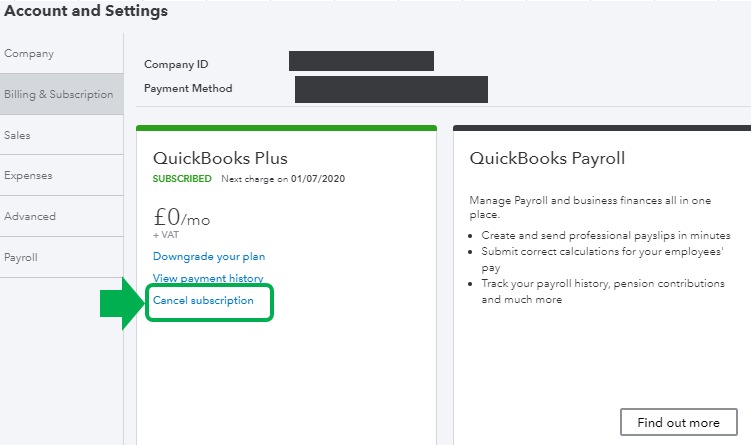
- Go to Settings: Click on the ‘Gear’ icon, then select ‘Account and Settings’.
- Access Billing & Subscription: In the left menu, click on ‘Billing & Subscription’.
- Cancel Subscription: Find the ‘Subscription status’ section and click ‘Cancel’.
- Follow the Prompts: Complete the process by following the on-screen prompts to cancel your subscription.
For Desktop Versions:
- Customer Service: Since desktop versions do not have an online cancellation feature, you need to contact QuickBooks customer service directly to cancel your software subscription or service.
Step 2: Ensure All Financial Data Is Backed Up
Before proceeding with account deletion, make sure to back up all your financial data. QuickBooks Online allows you to download reports and lists into Excel files, which you can save externally.
How to Backup Data in QuickBooks Online:
- Go to Reports: Open your QuickBooks dashboard.
- Choose Your Reports: Select the reports you need to back up.
- Export to Excel: Each report will have an option to export to Excel. Save these files securely.
Step 3: Clear Your Data (If Applicable)
In QuickBooks Online, once you cancel your subscription, Intuit maintains your data for one year in a read-only format. If you prefer to clear your data immediately, you need to contact QuickBooks support for assistance.
Step 4: Contact Support for Account Deletion
Finally, to delete your QuickBooks account, you’ll need to contact customer support directly. QuickBooks does not currently offer a direct way to delete your account online entirely:
- Contact Customer Support: Reach out to QuickBooks customer support via phone or email.
- Request Account Deletion: Explicitly state that you want your account to be deleted, not just canceled.

Frequently Asked Questions About Deleting a QuickBooks Account
Can I Reactivate My QuickBooks Account After Deletion?
Once your QuickBooks account is deleted, it cannot be reactivated. You will need to create a new account if you decide to use QuickBooks again in the future.
What Happens to My Data After Account Deletion?
After your QuickBooks account is deleted, all stored data will be permanently erased. Ensure you have backups of all important data before deletion.
Is There a Waiting Period for Deleting My QuickBooks Account?
Yes, after cancelling your subscription, there might be a waiting period during which your data is stored in a read-only format before it can be permanently deleted. Contact customer support for detailed information on timelines.
Conclusion
Deleting your QuickBooks account is a multi-step process that requires careful consideration, especially in terms of data backup and understanding the terms of service regarding data retention. Always ensure you have a complete backup of your financial data before proceeding with account cancellation and deletion to avoid any loss of important information.


Add Comment