As smartphones become indispensable tools in daily life, transitioning to a new device requires careful planning to ensure all data moves over safely. If you are upgrading to the iPhone 16, transferring everything from your old phone—whether it’s an older iPhone or an Android device—can be straightforward if done correctly. Apple has built robust tools and processes into its ecosystem to simplify this experience. However, understanding the options, troubleshooting potential challenges, and ensuring nothing is left behind requires a comprehensive approach.
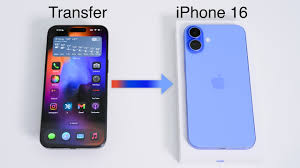
This guide walks you through the entire process, addressing concerns you might have while ensuring your data is safely transferred to your iPhone 16. From setting up your new device to understanding the specific steps for various data types, you’ll be equipped with everything you need to complete the transition smoothly.
Preparing for the Transition
Before diving into the transfer process, it’s crucial to prepare both your old device and the new iPhone 16. This involves backing up your current data, ensuring compatibility, and verifying that your new phone is fully charged and connected to a stable internet connection.
For iPhone users, backing up your data is best done through iCloud or iTunes (now replaced by Finder on macOS Catalina and later). Android users should back up their data using Google Drive or other cloud storage solutions. These backups act as safety nets in case of any issues during the transfer process.
Checklist for Preparation –
- Ensure the old device and the iPhone 16 are fully charged.2.
- Update both devices to their latest operating system versions.3.
- Confirm enough storage is available on your new iPhone to accommodate the data from your old phone.4
- Have necessary cables, Wi-Fi, and adapters ready if you plan to use a wired connection for the transfer.
Using Quick Start for iPhone-to-iPhone Transfers
Apple’s Quick Start feature makes transferring data between two iPhones incredibly easy. If both devices are running iOS 12.4 or later, you can use this feature to transfer data wirelessly during the setup process.
To get started, place the two devices near each other. After a prompt appears on your old iPhone, follow the on-screen instructions to set up the new iPhone 16. This process transfers apps, settings, and personal data directly between the devices.
While Quick Start simplifies the experience, ensure both phones remain close and connected to power throughout the transfer. Depending on the amount of data being moved, the process may take anywhere from a few minutes to several hours.
Using iCloud Backup to Transfer Data
For users heavily invested in Apple’s ecosystem, iCloud is the most seamless way to transfer data. This method is particularly useful if your old iPhone is no longer physically available. To use this method, you need an iCloud backup of your old device.
Begin by ensuring your old phone has been backed up to iCloud. This can be done by navigating to Settings > [Your Name] > iCloud > iCloud Backup and selecting Back Up Now. Once the backup is complete, power on the iPhone 16, follow the setup prompts, and select Restore from iCloud Backup.
Log in with your Apple ID, choose the most recent backup, and allow the restoration process to complete. All apps, settings, and personal files will be downloaded from the cloud, though large files may take longer depending on your internet speed.
Transferring Data Using iTunes or Finder
If you prefer a wired connection, using iTunes (or Finder on newer macOS versions) provides another reliable method for transferring data. Start by connecting your old phone to your computer and creating a local backup.
To back up your data, launch iTunes or Finder, select your device, and click Back Up Now. Once the backup is completed, connect your iPhone 16 to the computer and select Restore Backup. Choose the most recent backup and follow the prompts to transfer your data.
This method is especially useful if your iCloud storage is insufficient for a full backup. However, remember that you will need the same Apple ID on both devices to access certain files and apps.
Moving Data from Android to iPhone
Switching from an Android phone to the iPhone 16 requires a slightly different process. Apple’s Move to iOS app simplifies this transition by transferring contacts, message history, photos, videos, and more.
First, download the Move to iOS app on your Android device from the Google Play Store. During the initial setup of your iPhone 16, select the Move Data from Android option. Open the app on your Android device, enter the code displayed on your iPhone, and select the data you want to transfer.
This process requires both devices to be on the same Wi-Fi network. Note that certain apps may not transfer directly and need to be downloaded manually from the App Store.
Handling Media, Apps, and Accounts
While the above methods handle most types of data, some media files, applications, and account credentials require special attention. Photos, videos, and music stored locally on your old device can be transferred via cloud storage or a computer. Services like Google Photos, Dropbox, or iCloud Photos ensure that your media files are synchronized across devices.
For apps, reinstalling them on the iPhone 16 may be necessary, particularly for apps that are platform-specific or tied to your Apple ID. Ensure you log into the same account on your new device to access in-app purchases or subscriptions.
Email accounts, calendars, and contacts linked to third-party services (e.g., Google, Microsoft) should be added manually through the iPhone’s settings.
Troubleshooting Common Issues
Despite the tools available, transferring data can occasionally encounter challenges. If the process stalls or fails, restarting both devices often resolves the issue. Additionally, ensure that all software is updated to the latest version and that you are following the correct steps for your chosen transfer method.
If you encounter storage limitations on your iPhone 16, consider offloading unnecessary files from your old device before starting the transfer. Alternatively, upgrading your iCloud storage plan or using a wired transfer can help bypass these limitations.
Finalizing the Setup
After successfully transferring your data, spend some time exploring your new iPhone 16 to ensure everything is in place. Check that all important apps, contacts, and files have been transferred, and verify that your accounts are synced.
Enable two-factor authentication for added security and explore new features exclusive to the iPhone 16 to maximize your experience.
Moving to a new iPhone 16 doesn’t have to be daunting. With the right preparation and a clear understanding of the tools at your disposal, you can seamlessly transfer all your data without any loss or complications. Whether you’re upgrading from an older iPhone or making the switch from Android, these methods ensure a smooth and secure transition to Apple’s latest device.
By following these steps, you’ll not only preserve your valuable data but also unlock the full potential of your new phone, making the upgrade an exciting and hassle-free experience.





Add Comment